作为Write for DOnations计划的一部分,作者选择了免费和开源基金来接受捐赠。
介绍
当多人同时从不同位置处理同一个 Terraform 项目时,正确处理基础设施代码和项目状态以避免覆盖错误非常重要。解决方案是远程存储状态而不是本地。远程系统可供团队的所有成员使用,他们可以在工作时锁定状态。
一个这样的远程后端是pg,它将状态存储在 PostgreSQL 数据库中。在本教程的过程中,您将使用DigitalOcean 托管数据库来确保数据可用性。
Terraform 还支持 HashiCorp 的官方托管云产品Terraform Cloud,这是一种专有应用程序,可在一个地方同步您团队的工作,并提供用于配置和管理的用户界面。
在本教程中,您将在 Terraform Cloud 中创建一个组织,并将您的项目连接到该组织。然后,您将使用您的组织来设置工作区和资源。您将状态存储在托管云中,以便它始终可用。您还将pg使用随附的托管 PostgreSQL 数据库设置后端。
先决条件
- DigitalOcean 个人访问令牌,您可以通过 DigitalOcean 控制面板创建。您可以在如何生成个人访问令牌 中找到创建此令牌的说明。
- Terraform 安装在您的本地计算机上,并使用 DigitalOcean 提供商设置了一个项目。完成第1步中的如何使用Terraform与DigitalOcean教程。
- 如果您想使用
pg后端,则需要创建和访问托管 PostgreSQL数据库集群。有关更多信息,请访问快速入门指南。您可以在本教程中使用单独的数据库。 - 如果您想使用 HashiCorp 的托管云,您将需要一个Terraform Cloud帐户。您可以在他们的注册页面上创建一个。
注意:我们已经使用 Terraform 专门测试了本教程0.13。
在 Terraform Cloud 中存储状态
在这一步中,您将创建一个部署 Droplet 的项目,但不是在本地存储状态,而是使用Terraform Cloud作为remote提供程序的后端。这需要在 Terraform Cloud 中创建组织和工作区,编写基础设施代码并进行规划。
创建组织
Terraform Cloud 允许您拥有多个组织,其中包含您的工作区和模块。付费计划组织可以拥有多个具有访问级别控制功能的团队,而您将使用的免费计划为每个组织提供一个团队。您可以邀请团队成员加入组织。
首先前往Terraform Cloud并登录。如果您尚未创建组织,它会提示您这样做。
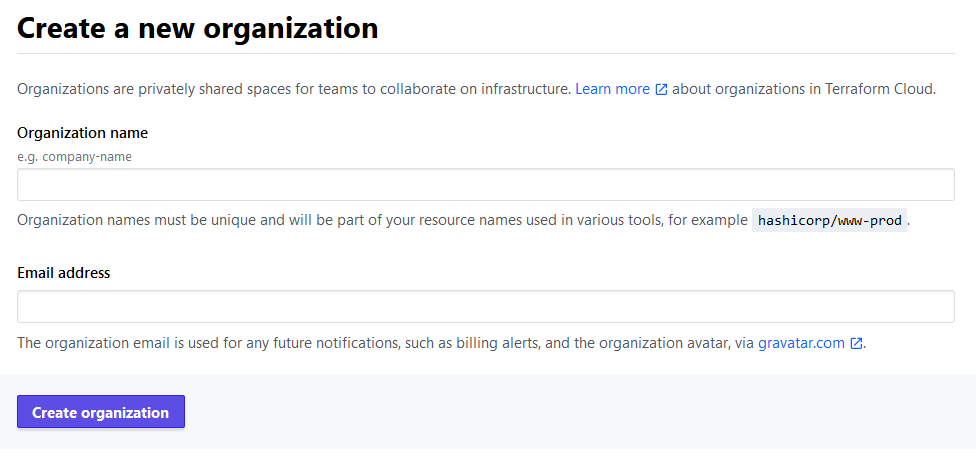
输入您选择的组织名称,并记住它在 Terraform Cloud 中的所有名称中必须是唯一的。如果名称已存在,您将收到错误消息。电子邮件地址应该已经填写了您的帐户地址。完成后,单击创建组织按钮继续。
然后它会要求您选择工作区的类型。
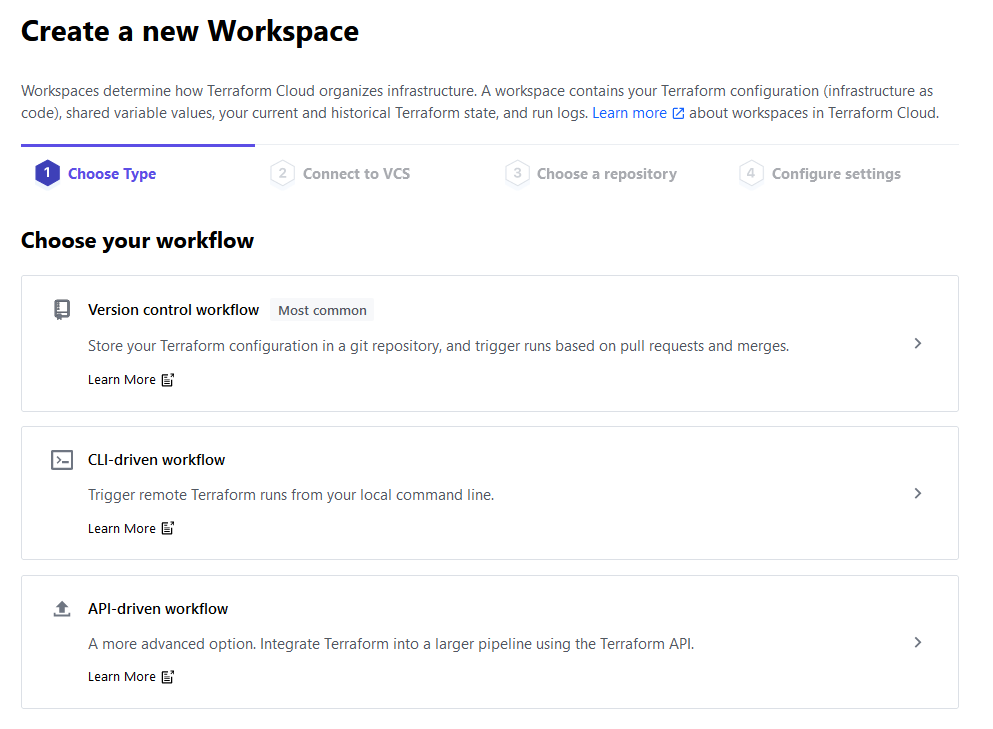
由于您将使用命令行与 Terraform Cloud 交互,因此请单击CLI 驱动的工作流选项。然后,为您的工作区输入一个名称。
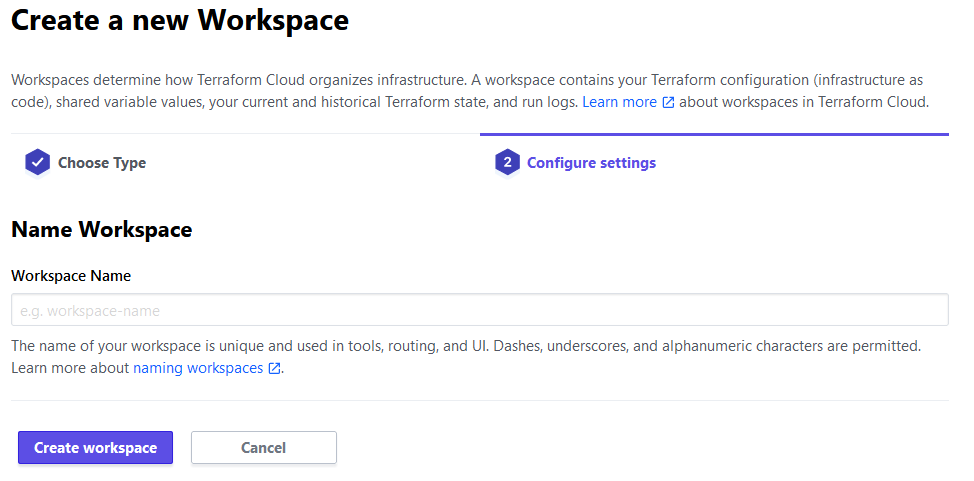
输入您选择的工作区名称(我们称之为sammy),然后单击创建工作区以完成组织创建过程。然后它会将您定向到工作区设置页面。

您现在已经创建了您的工作区,它是您组织的一部分。由于您刚刚创建了它,因此您的工作区不包含基础结构代码。在界面的中央部分,Terraform Cloud 为您提供了连接到此工作区的入门说明。
在连接到它之前,您需要配置云将用于执行您的命令的 Terraform 版本。要设置它,请单击右上角的设置下拉菜单,然后从列表中选择常规。当页面打开时,导航到Terraform 版本下拉菜单并选择0.13.1(对于本教程)。

然后,单击“保存设置”按钮以保存更改。
要将您的项目连接到您的组织和工作区,您首先需要使用命令行登录。在运行命令之前,导航到令牌页面为您的服务器创建一个新的访问令牌,这将提供对您帐户的访问。您将收到创建 API 令牌的提示。
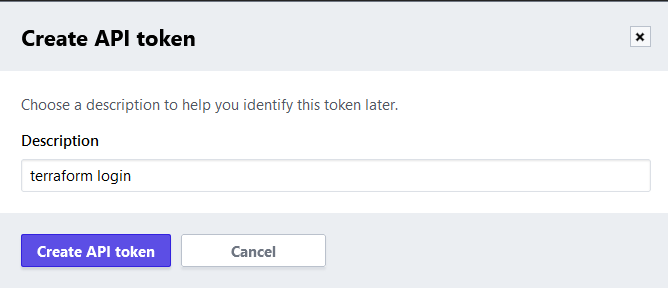
默认描述没问题,所以点击创建 API 令牌来创建它。
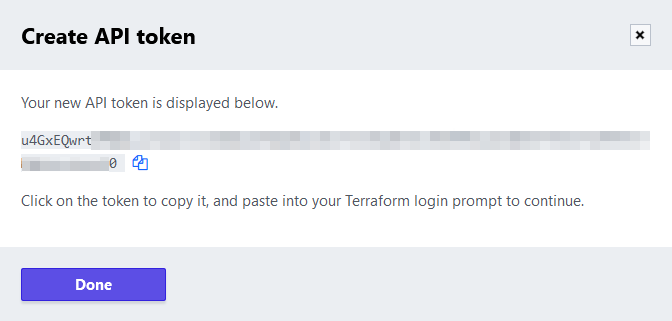
单击令牌值或其后的图标以复制 API 令牌。您将使用此令牌将您的项目连接到您的 Terraform Cloud 帐户。
在命令行中,运行以下命令登录:
- terraform login
您将收到以下输出:
OutputTerraform will request an API token for app.terraform.io using your browser.

If login is successful, Terraform will store the token in plain text in
the following file for use by subsequent commands:
    /home/sammy/.terraform.d/credentials.tfrc.json

Do you want to proceed?
  Only 'yes' will be accepted to confirm.
...
Terraform 警告您令牌将存储在本地。yes当它提示您时输入:
Output---------------------------------------------------------------------------------

Open the following URL to access the tokens page for app.terraform.io:
    https://app.terraform.io/app/settings/tokens?source=terraform-login


---------------------------------------------------------------------------------

Generate a token using your browser, and copy-paste it into this prompt.

Terraform will store the token in plain text in the following file
for use by subsequent commands:
    /home/sammy/.terraform.d/credentials.tfrc.json

Token for app.terraform.io:
  Enter a value:
粘贴您复制的令牌并使用 确认ENTER。Terraform 将显示一条成功消息:
Output
Retrieved token for user your_username


---------------------------------------------------------------------------------

Success! Terraform has obtained and saved an API token.

The new API token will be used for any future Terraform command that must make
authenticated requests to app.terraform.io.
您已将本地 Terraform 安装配置为访问您的 Terraform Cloud 帐户。您现在将创建一个部署 Droplet 的项目,并将其配置为使用 Terraform Cloud 存储其状态。
设置项目
首先,创建一个名为terraform-team-remote您将存储项目的目录:
- mkdir ~/terraform-team-remote
导航到它:
- cd ~/terraform-team-remote
要设置您的项目,您需要:
- 定义和配置
remote与 Terraform Cloud 接口的提供程序。 - 要求
digitalocean提供者能够部署 DigitalOcean 资源。 - 定义和初始化您将使用的变量。
您将提供程序和模块要求规范存储在名为provider.tf. 通过运行创建并打开它进行编辑:
- nano provider.tf
添加以下几行:
terraform {
  required_version = "0.13.1"

  required_providers {
    digitalocean = {
      source = "digitalocean/digitalocean"
      version = ">1.22.2"
    }
  }

  backend "remote" {
    hostname = "app.terraform.io"
    organization = "your_organization_name"

    workspaces {
      name = "your_workspace_name"
    }
  }
}

variable "do_token" {}

provider "digitalocean" {
  token = var.do_token
}
在这里,您首先指定您的 Terraform 版本。然后,您digitalocean根据需要指定提供程序并将后端设置为remote.
其主机名设置为app.terraform.io,即 Terraform Cloud 的地址。对于organizationand workspaces.name,将突出显示的值替换为您指定的名称。
接下来,您定义一个名为 的变量do_token,您将其传递给digitalocean在它之后创建的提供程序。您现在已将项目配置为连接到您的组织,因此请保存并关闭文件。
使用以下命令初始化您的项目:
- terraform init
输出将类似于:
OutputInitializing the backend...

Successfully configured the backend "remote"! Terraform will automatically
use this backend unless the backend configuration changes.

Initializing provider plugins...
- Finding digitalocean/digitalocean versions matching "> 1.22.2"...
- Installing digitalocean/digitalocean v2.3.0...
- Installed digitalocean/digitalocean v2.3.0 (signed by a HashiCorp partner, key ID F82037E524B9C0E8)

Partner and community providers are signed by their developers.
If you'd like to know more about provider signing, you can read about it here:
https://www.terraform.io/docs/plugins/signing.html

Terraform has been successfully initialized!
...
接下来,在名为的文件中定义 Droplet droplets.tf。通过运行创建并打开它进行编辑:
- nano droplets.tf
添加以下几行:
resource "digitalocean_droplet" "web" {
  image  = "ubuntu-18-04-x64"
  name   = "web-1"
  region = "fra1"
  size   = "s-1vcpu-1gb"
}
此代码将部署web-1在该fra1区域中调用的 Droplet ,在 1GB RAM 和一个 CPU 内核上运行 Ubuntu 18.04。这就是您需要定义的全部内容,因此请保存并关闭文件。
剩下要定义的是变量值。该remote供应商不支持的值传递给变量通过命令行,所以你必须通过他们在使用可变文件或设置他们Terraform云。Terraform 从文件名以.auto.tfvars. 创建并打开一个vars.auto.tfvars用于编辑的文件,您将在其中定义do_token变量:
- nano vars.auto.tfvars
添加以下行,替换your_do_token为您的 DigitalOcean API 令牌:
do_token = "your_do_token"
完成后,保存并关闭文件。Terraform 将在计划操作时自动读取此文件。
您的项目现已完成并设置为使用 Terraform Cloud 作为其后端。您现在将计划和应用 Droplet,并查看它在 Cloud 应用程序中的反映方式。
应用配置
由于您尚未规划或应用您的项目,因此 Terraform Cloud 中的工作区当前为空。您可以尝试通过运行以下命令来更新项目来应用该项目:
- terraform apply
您会注意到输出与local用作后端时的输出不同:
OutputRunning apply in the remote backend. Output will stream here. Pressing Ctrl-C
will cancel the remote apply if it's still pending. If the apply started it
will stop streaming the logs, but will not stop the apply running remotely.

Preparing the remote apply...

To view this run in a browser, visit:
https://app.terraform.io/app/sammy-shark/sammy/runs/run-QnAh2HDwx6zWbNV1

Waiting for the plan to start...

Terraform v0.13.1
Configuring remote state backend...
Initializing Terraform configuration...
Refreshing Terraform state in-memory prior to plan...
The refreshed state will be used to calculate this plan, but will not be
persisted to local or remote state storage.


------------------------------------------------------------------------

An execution plan has been generated and is shown below.
Resource actions are indicated with the following symbols:
  + create

Terraform will perform the following actions:

  # digitalocean_droplet.web will be created
  + resource "digitalocean_droplet" "web" {
      + backups              = false
      + created_at           = (known after apply)
      + disk                 = (known after apply)
      + id                   = (known after apply)
      + image                = "ubuntu-18-04-x64"
      + ipv4_address         = (known after apply)
      + ipv4_address_private = (known after apply)
      + ipv6                 = false
      + ipv6_address         = (known after apply)
      + locked               = (known after apply)
      + memory               = (known after apply)
      + monitoring           = false
      + name                 = "web-1"
      + price_hourly         = (known after apply)
      + price_monthly        = (known after apply)
      + private_networking   = (known after apply)
      + region               = "fra1"
      + resize_disk          = true
      + size                 = "s-1vcpu-1gb"
      + status               = (known after apply)
      + urn                  = (known after apply)
      + vcpus                = (known after apply)
      + volume_ids           = (known after apply)
      + vpc_uuid             = (known after apply)
    }

Plan: 1 to add, 0 to change, 0 to destroy.
...
使用remote后端时,Terraform 不会从本地机器规划或应用配置。相反,它将这些任务委托给云,并且仅实时将输出流式传输到控制台。
输入yes提示时。Terraform 将很快完成应用配置,您可以导航到 Terraform Cloud 网站上的工作区,发现它已应用新操作。

您现在可以通过运行以下命令销毁已部署的资源:
- terraform destroy
在本节中,您已将项目连接到 Terraform Cloud。您现在将使用另一个后端 ,pg它将状态存储在 PostgreSQL 数据库中。
在托管 PostgreSQL 数据库中存储状态
在本节中,您将设置一个部署 Droplet 的项目,与上一步非常相似。但是,这一次,您将使用pg提供程序将状态存储在 DigitalOcean Managed PostgreSQL 数据库中。此提供程序支持状态锁定,因此状态永远不会被同时发生的两个或多个更改覆盖。
首先创建一个名为的目录terraform-team-pg,您将在其中存储项目:
- mkdir ~/terraform-team-pg
导航到它:
- cd ~/terraform-team-pg
与上一节一样,您将首先定义提供程序,然后传入数据库和digitalocean模块的连接字符串。创建并打开provider.tf以进行编辑:
- nano provider.tf
添加以下几行:
terraform {
  required_providers {
    digitalocean = {
      source = "digitalocean/digitalocean"
      version = ">1.22.2"
    }
  }

  backend "pg" {
    conn_str = "your_db_connection_string"
  }
}

variable "do_token" {}

provider "digitalocean" {
  token = var.do_token
}
在这里,您需要digitalocean提供程序并定义pg接受连接字符串的后端。然后,您定义do_token变量并将其传递给digitalocean提供程序的实例。
请记住your_db_connection_string从您的DigitalOcean 控制面板替换为您的托管数据库的连接字符串。然后保存并关闭文件。
警告:要继续,请在您的数据库的设置中,确保您在许可名单上拥有运行 Terraform 的计算机的 IP 地址。
通过运行初始化项目:
- terraform init
输出将类似于以下内容:
OutputInitializing the backend...

Successfully configured the backend "pg"! Terraform will automatically
use this backend unless the backend configuration changes.

Error: No existing workspaces.

Use the "terraform workspace" command to create and select a new workspace.
If the backend already contains existing workspaces, you may need to update
the backend configuration.
Terraform 成功初始化后端;意味着它连接到数据库。但是,它抱怨没有工作区,因为它在初始化期间没有创建工作区。要解决此问题,请创建一个default工作区并通过运行以下命令切换到该工作区:
- terraform workspace new default
输出如下:
OutputCreated and switched to workspace "default"!

You're now on a new, empty workspace. Workspaces isolate their state,
so if you run "terraform plan" Terraform will not see any existing state
for this configuration.
要完成初始化过程,请terraform init再次运行:
- terraform init
您将收到显示它已成功完成的输出:
OutputInitializing the backend...

Initializing provider plugins...
- Finding digitalocean/digitalocean versions matching "> 1.22.2"...
- Installing digitalocean/digitalocean v2.3.0...
- Installed digitalocean/digitalocean v2.3.0 (signed by a HashiCorp partner, key ID F82037E524B9C0E8)

Partner and community providers are signed by their developers.
If you'd like to know more about provider signing, you can read about it here:
https://www.terraform.io/docs/plugins/signing.html

Terraform has been successfully initialized!
由于 Droplet 定义与之前的项目相同,您可以通过运行将其复制过来:
- cp ../terraform-team-remote/droplets.tf .
您需要在环境变量中使用 DigitalOcean 令牌。创建一个,替换your_do_token为您的令牌:
- export DO_PAT="your_do_token"
要检查与数据库的连接是否正常,请尝试规划配置:
- terraform plan -var "do_token=${DO_PAT}"
输出将类似于以下内容:
OutputRefreshing Terraform state in-memory prior to plan...
The refreshed state will be used to calculate this plan, but will not be
persisted to local or remote state storage.


------------------------------------------------------------------------

An execution plan has been generated and is shown below.
Resource actions are indicated with the following symbols:
  + create

Terraform will perform the following actions:

  # digitalocean_droplet.web will be created
  + resource "digitalocean_droplet" "web" {
      + backups              = false
      + created_at           = (known after apply)
      + disk                 = (known after apply)
      + id                   = (known after apply)
      + image                = "ubuntu-18-04-x64"
      + ipv4_address         = (known after apply)
      + ipv4_address_private = (known after apply)
      + ipv6                 = false
      + ipv6_address         = (known after apply)
      + locked               = (known after apply)
      + memory               = (known after apply)
      + monitoring           = false
      + name                 = "web-1"
      + price_hourly         = (known after apply)
      + price_monthly        = (known after apply)
      + private_networking   = (known after apply)
      + region               = "fra1"
      + resize_disk          = true
      + size                 = "s-1vcpu-1gb"
      + status               = (known after apply)
      + urn                  = (known after apply)
      + vcpus                = (known after apply)
      + volume_ids           = (known after apply)
      + vpc_uuid             = (known after apply)
    }

Plan: 1 to add, 0 to change, 0 to destroy.
...
Terraform 没有报告任何错误,并像往常一样计划了操作。它成功连接到您的 PostgreSQL 数据库并存储其状态。多人现在可以同时处理此项目,同时项目保持同步。
结论
在本教程中,您使用了两个不同的后端:Terraform Cloud,它是 HashiCorp 为 Terraform 提供的托管云产品;和pg,它允许您将项目的状态存储在 PostgreSQL 数据库中。您使用了来自 DigitalOcean 的托管 PostgreSQL 数据库,您可以在几分钟内配置并与 Terraform 一起使用。
有关 Terraform Cloud 功能的更多信息,请访问官方文档。
