介绍
Chart.js是一个流行的 JavaScript 图表库,ng2-charts是 Angular 2+ 的包装器,用于将 Chart.js 集成到 Angular 中。
在本教程中,您将使用 Chart.js 并ng2-charts在 Angular 应用程序中创建示例图表。
先决条件
要完成本教程,您需要:
- Node.js 安装在本地,您可以按照如何安装 Node.js 和创建本地开发环境来完成。
- 熟悉设置 Angular 项目和使用 Angular 组件可能会有所帮助。
本教程已通过 Node v14.13.1、npmv6.14.8、angularv10.1.6、chart.jsv2.9.4 和v2.4.2验证ng2-charts。
步骤 1 — 设置项目
您可以使用它@angular/cli来创建一个新的 Angular 项目。
在终端窗口中,使用以下命令:
- npx @angular/cli new angular-chartjs-example --style=css --routing=false --skip-tests
这将配置一个新的 Angular 项目,其样式设置为“CSS”(与“Sass”、Less 或“Stylus”相反),没有路由,并跳过测试。
导航到新创建的项目目录:
- cd angular-chartjs-example
从您的项目文件夹中,运行以下命令进行安装chart.js:
- npm install chart.js@2.9.4 ng2-charts@2.4.2
接下来,chart.js通过angular.json在代码编辑器中打开并将其修改为包含Chart.min.js以下内容来添加到 Angular 应用程序:
{
  // ...
  "projects": {
    "angular-chartjs-example": {
      // ...
      "architect": {
        "build": {
          // ...
          "options": {
            // ...
            "scripts": [
              "node_modules/chart.js/dist/Chart.min.js"
            ],
            "allowedCommonJsDependencies": [
              "chart.js"
            ]
          },
          // ...
        },
      }
    }},
  // ...
}
注意:添加chart.js到allowedCommonJsDependencies将阻止“ CommonJS or AMD dependencies can cause optimization bailouts.”警告。
然后,app.module.ts在您的代码编辑器中打开并修改它以导入ChartsModule:
import { BrowserModule } from '@angular/platform-browser';
import { NgModule } from '@angular/core';
import { ChartsModule } from 'ng2-charts';

import { AppComponent } from './app.component';

@NgModule({
  declarations: [
    AppComponent
  ],
  imports: [
    BrowserModule,
    ChartsModule
  ],
  providers: [],
  bootstrap: [AppComponent]
})
export class AppModule { }
设置好这个脚手架后,您可以开始处理图表组件。
第 2 步 – 创建图表组件
让我们从一个示例开始,该示例使用一些选项作为输入传入,以在四个月的过程中绘制与三个不同帐户关联的值。
ng2-charts为您提供baseChart可应用于 HTMLcanvas元素的指令。
app.component.html在代码编辑器中打开并将内容替换为以下代码行:
<div style="width: 40%;">
  <canvas
    baseChart
  >
  </canvas>
</div>
然后,修改画布以传入chartType和legend:
<div style="width: 40%;">
  <canvas
    ...
    [chartType]="'line'"
    [legend]="true"
  >
  </canvas>
</div>
chartType:这将设置图表的基本类型。该值可以是pie,doughnut,bar,line,polarArea,radar,或horizontalBar。legend: 图例是否应显示在图表上方的布尔值。
然后,修改画布以传入datasets:
<div style="width: 40%;">
  <canvas
    ...
    [datasets]="chartData"
  >
  </canvas>
</div>
接下来,app.component.ts在代码编辑器中打开以定义您在模板中引用的数组:
// ...
export class AppComponent {
  // ...

  chartData = [
    {
      data: [330, 600, 260, 700],
      label: 'Account A'
    },
    {
      data: [120, 455, 100, 340],
      label: 'Account B'
    },
    {
      data: [45, 67, 800, 500],
      label: 'Account C'
    }
  ];
}
datasets:这应该是一个对象数组,其中包含数据数组和每个数据集的标签。data: 或者,如果您的图表很简单并且只有一个数据集,您可以使用data代替datasets并传入一组数据点。
现在,重新访问app.component.html并修改画布以传入labels:
<div style="width: 40%;">
  <canvas
    ...
    [labels]="chartLabels"
  >
  </canvas>
</div>
接下来,app.component.ts在代码编辑器中重新打开以定义您在模板中引用的数组:
// ...
export class AppComponent {
  // ...

  chartLabels = [
    'January',
    'February',
    'March',
    'April'
  ];
}
labels:X 轴的标签数组。
现在,重新访问app.component.html并修改画布以传入options:
<div style="width: 40%;">
  <canvas
    ...
    [options]="chartOptions"
  >
  </canvas>
</div>
接下来,app.component.ts在代码编辑器中重新打开以定义您在模板中引用的对象:
// ...
export class AppComponent {
  // ...

  chartOptions = {
    responsive: true
  };
}
options:包含图表选项的对象。您可以参考官方Chart.js 文档以了解有关可用选项的详细信息。
重新编译您的应用程序:
- npm start
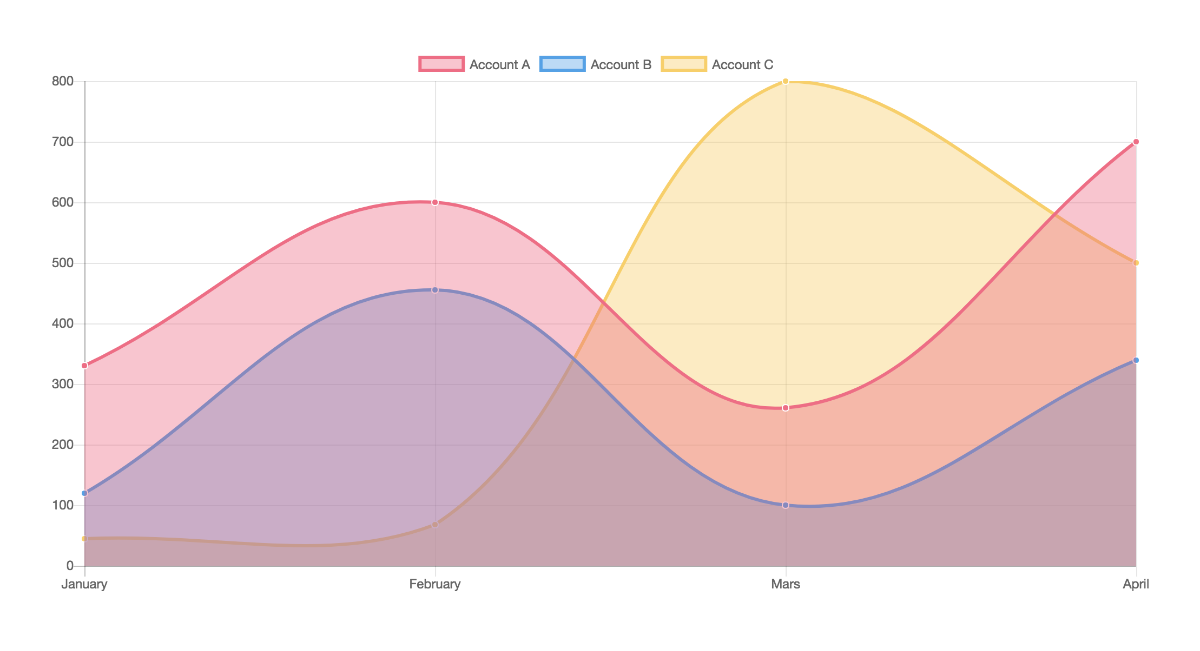
在 Web 浏览器(通常是localhost:4200)中访问您的应用程序时,您会看到一个图表,其中包含Account A、Account B、 和、、、Account C月份的数据:AprilFebruaryMarchApril

Chart.js 有其他可用的属性和选项,这些属性和选项包含在官方文档中。
步骤 3 — 处理chartClick和chartHover
发出两个事件,chartClick和chartHover,它们提供了一种方式来对与图表交互的用户做出反应。当前活动的点和标签作为发射事件数据的一部分返回。
让我们创建一个将这些添加到画布的示例。
打开app.component.html并添加chartHover和chartClick:
<div style="width: 40%;">
  <canvas
    ...
    (chartHover)="onChartHover(($event)"
    (chartClick)="onChartClick(($event)"
  >
  </canvas>
</div>
打开app.component.ts并添加您从模板中引用的自定义函数:
// ...
export class AppComponent {
  // ...

  onChartHover = ($event: any) => {
    window.console.log('onChartHover', $event);
  };

  onChartClick = ($event: any) => {
    window.console.log('onChartClick', $event);
  };
}
重新编译您的应用程序后,您将观察onChartHover并onChartClick登录您的开发人员工具。
第 4 步 – 动态更新数据集
使用 Chart.js 的一大亮点是能够动态更新或响应从后端或用户输入接收的数据。
让我们继续构建上一个示例,其中绘制了 4 个月的 3 个帐户值,并添加了 5 月份的新数据点。
打开app.component.ts并定义自定义函数:
// ...
export class AppComponent {
  // ...

  newDataPoint(dataArr = [100, 100, 100], label) {
    this.chartData.forEach((dataset, index) => {
      this.chartData[index] = Object.assign({}, this.chartData[index], {
        data: [...this.chartData[index].data, dataArr[index]]
      });
    });

    this.chartLabels = [...this.chartLabels, label];
  }
}
[100, 100, 100]如果没有将数组传递给 ,则提供作为默认值newDataPoint()。
也没有对数据集数组执行任何突变。Object.assign用于返回包含先前数据和新数据的新对象。
然后,app.component.html在 abutton之后打开并使用自定义函数canvas:
<div style="width: 40%;">
  ...

  <button (click)="newDataPoint([900, 50, 300], 'May')">
    Add data point
  </button>
</div>
重新编译应用程序后,您将观察到图表将绘制Account A、Account B、与添加数据点按钮交互Account C的月份的值。May
结论
在本教程中,您使用了 Chart.js 并ng2-charts在 Angular 应用程序中创建了一个示例图表。
这些库共同为您提供了以现代和动态的方式呈现数据的能力。
如果您想了解有关 Angular 的更多信息,请查看我们的 Angular 主题页面以获取练习和编程项目。
