Espresso 测试框架 – 设置说明
Espresso 测试框架 – 设置说明
在本章中,让我们了解如何安装 espresso 框架,配置它以编写 espresso 测试并在我们的 android 应用程序中执行它。
先决条件
Espresso 是一个用户界面测试框架,用于测试使用 Android SDK 以 Java / Kotlin 语言开发的 Android 应用程序。因此,espresso 的唯一要求是使用 Java 或 Kotlin 中的 Android SDK 开发应用程序,并建议使用最新的 Android Studio。
在我们开始在 espresso 框架中工作之前要正确配置的项目列表如下 –
-
安装最新的 Java JDK 并配置 JAVA_HOME 环境变量。
-
安装最新的 Android Studio(3.2 版或更高版本)。
-
使用 SDK Manager 安装最新的 Android SDK 并配置 ANDROID_HOME 环境变量。
-
安装最新的 Gradle Build Tool 并配置 GRADLE_HOME 环境变量。
配置 EspressoTesting 框架
最初,espresso 测试框架作为 Android 支持库的一部分提供。后来,Android 团队提供了一个新的 Android 库 AndroidX,并将最新的 espresso 测试框架开发移入该库中。espresso 测试框架的最新开发(Android 9.0,API 级别 28 或更高)将在 AndroidX 库中完成。
在项目中包含 espresso 测试框架就像在应用程序 gradle 文件 app/build.gradle 中将 espresso 测试框架设置为依赖项一样简单。完整的配置如下,
使用 Android 支持库,
android {
   defaultConfig {
      testInstrumentationRunner "android.support.test.runner.AndroidJUnitRunner"
   }
}
dependencies {
   testImplementation 'junit:junit:4.12'
   androidTestImplementation 'com.android.support.test:runner:1.0.2'
   androidTestImplementation 'com.android.support.test.espresso:espressocore:3.0.2'
}
使用 AndroidX 库,
android {
   defaultConfig {
      testInstrumentationRunner "androidx.test.runner.AndroidJUnitRunner"
   }
}
dependencies {
   testImplementation 'junit:junit:4.12'
   androidTestImplementation 'com.androidx.test:runner:1.0.2'
   androidTestImplementation 'com.androidx.espresso:espresso-core:3.0.2'
}
testInstrumentationRunner在安卓/ defaultConfig设置AndroidJUnitRunner类运行的仪器测试。依赖项中的第一行包括JUnit测试框架,依赖项中的第二行包括运行测试用例的测试运行器库,最后依赖项中的第三行包括 espresso 测试框架。
默认情况下,Android Studio 在创建 android 项目时将 espresso 测试框架(Android 支持库)设置为依赖项,gradle 将从 Maven 存储库中下载必要的库。让我们创建一个简单的 Hello world android 应用程序并检查 espresso 测试框架是否配置正确。
创建新的 Android 应用程序的步骤如下所述 –
-
启动安卓工作室。
-
选择文件→新建→新建项目。
-
输入应用程序名称 (HelloWorldApp) 和公司域 (espressosamples.tutorialspoint.com),然后单击下一步。
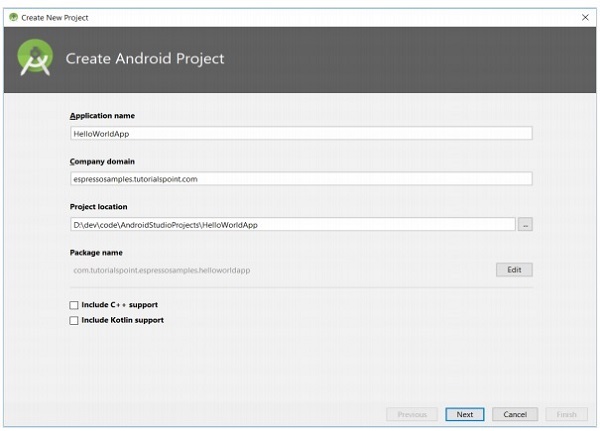
要创建 Android 项目,
-
选择最低 API 作为 API 15:Android 4.0.3 (IceCreamSandwich),然后单击下一步。
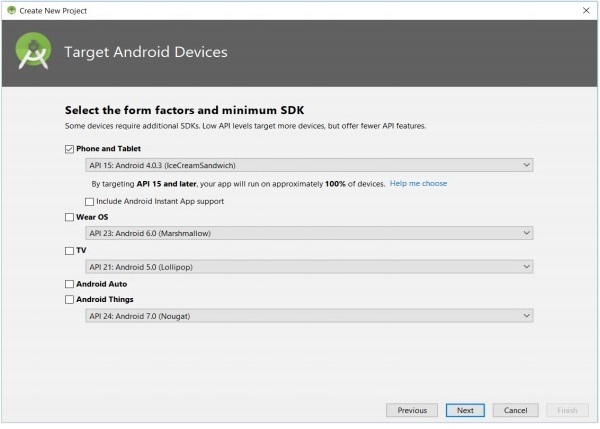
要定位 Android 设备,
-
选择空活动,然后单击下一步。
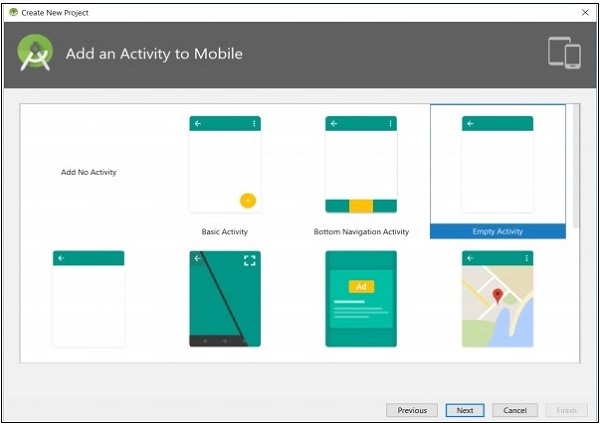
要将活动添加到移动设备,
-
输入主要活动的名称,然后点击完成。
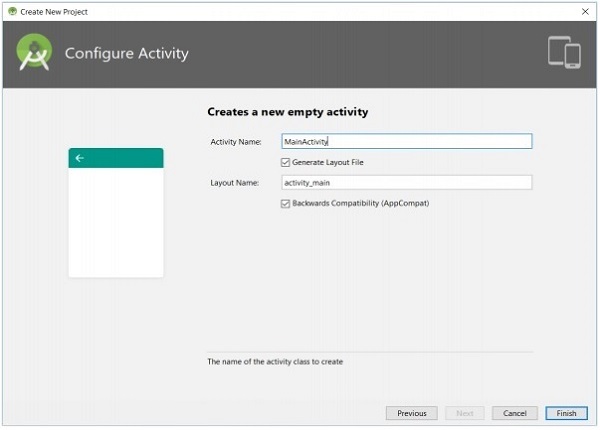
要配置活动,
-
一旦创建了一个新项目,打开app/build.gradle文件并检查其内容。文件的内容在下面指定,
apply plugin: 'com.android.application'
android {
   compileSdkVersion 28
   defaultConfig {
      applicationId "com.tutorialspoint.espressosamples.helloworldapp"
      minSdkVersion 15
      targetSdkVersion 28
      versionCode 1
      versionName "1.0"
      testInstrumentationRunner "android.support.test.runner.AndroidJUnitRunner"
   }
   buildTypes {
      release {
         minifyEnabled false
         proguardFiles getDefaultProguardFile('proguard-android.txt'),    'proguard-rules.pro'
      }
   }
}
dependencies {
   implementation fileTree(dir: 'libs', include: ['*.jar'])
   implementation 'com.android.support:appcompat-v7:28.0.0'
   implementation 'com.android.support.constraint:constraint-layout:1.1.3'
   testImplementation 'junit:junit:4.12'
   androidTestImplementation 'com.android.support.test:runner:1.0.2'
   androidTestImplementation 'com.android.support.test.espresso:espressocore:3.0.2'
}
最后一行指定 espresso 测试框架依赖项。默认情况下,配置了 Android 支持库。我们可以通过单击菜单中的Refactor → Migrate to AndroidX来重新配置应用程序以使用AndroidX库。
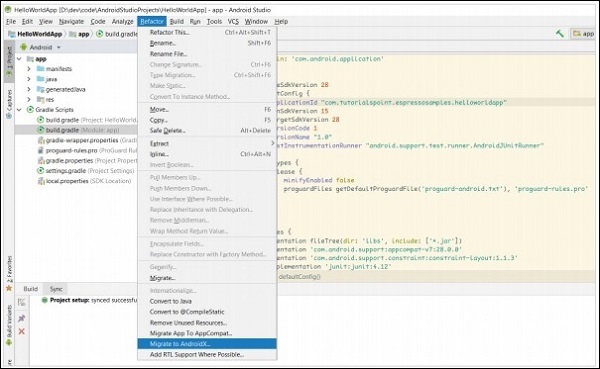
要迁移到 Androidx,
-
现在,app/build.gradle更改如下,
apply plugin: 'com.android.application'
android {
   compileSdkVersion 28
   defaultConfig {
      applicationId "com.tutorialspoint.espressosamples.helloworldapp"
      minSdkVersion 15
      targetSdkVersion 28
      versionCode 1
      versionName "1.0"
      testInstrumentationRunner "androidx.test.runner.AndroidJUnitRunner"
   }
   buildTypes {
      release {
         minifyEnabled false
         proguardFiles getDefaultProguardFile('proguard-android.txt'), 'proguard-rules.pro'
      }
   }
}
dependencies {
   implementation fileTree(dir: 'libs', include: ['*.jar'])
   implementation 'androidx.appcompat:appcompat:1.1.0-alpha01'
   implementation 'androidx.constraintlayout:constraintlayout:2.0.0-alpha3'
   testImplementation 'junit:junit:4.12'
   androidTestImplementation 'androidx.test:runner:1.1.1'
   androidTestImplementation 'androidx.test.espresso:espresso-core:3.1.1'
}
现在,最后一行包括来自 AndroidX 库的 espresso 测试框架。
设备设置
测试时,建议在Android设备上关闭动画,用于测试。这将减少检查空闲资源时的混淆。
让我们看看如何在 Android 设备上禁用动画——(设置 → 开发者选项),
-
窗口动画比例
-
过渡动画比例
-
动画师持续时间比例
如果“设置”屏幕中的“开发人员选项”菜单不可用,请多次单击“关于手机”选项中的可用版本号。这将启用开发人员选项菜单。
